All of our bikes are built, setup and safety checked before being repackaged ready for shipping to your front door where it will require minimal assembly before you get out and get riding.

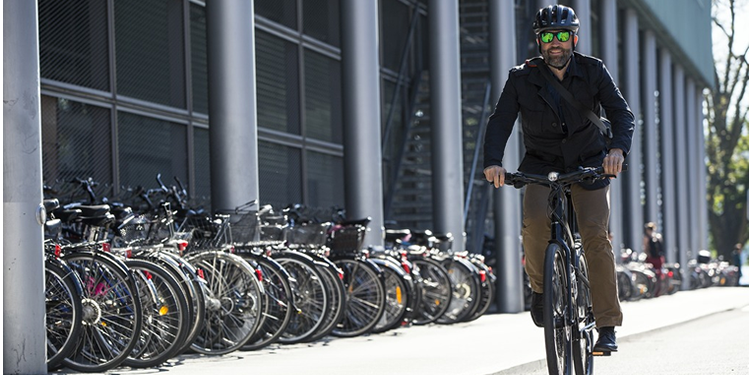
Your New Bike is in Good Hands
We believe that buying a new bike should be an easy and enjoyable process. From the moment you place your order, your new bike is in excellent hands. It’s important to us that you enjoy riding as much as we do so we take extra care to make sure your experience is as smooth as possible. Every bike we sell is built to order by certified mechanics and we ensure every bike is thoroughly tested, carefully packaged and delivered safely.
Assembled With Care
When you purchase a bike from 99 Bikes it will undergo a complete build and have a thorough pre-delivery inspection (known in the trade as a PDI). All of our mechanics are Cytech certified and know bikes inside out. The bikes are built in a clean and fully equipped workshop and hand assembled with care.
Properly Packaged
Our mechanics are experts in packaging bikes safely and securely. We use foam padding, extra long zip ties and plastic contact point protectors which have been specifically designed to protect bikes in transit. We only use the manufacturer’s original cardboard boxes to transport bikes; they are nearly 1 cm thick and have been carefully designed to protect bikes in transit.
Fitting Pedals
Remember the left pedal spindle is reverse threaded. Turn it anti-clockwise to tighten the pedal when facing the crank arm. The right side is normal, so turn it clockwise to tighten it. click here to watch a helpful video on how to do it correctly
-
Most of the bikes we sell are not supplied with pedals so it’s worth browsing our pedals for sale and adding a pair to your basket before checking out.
-
Any accessories purchased with the bike such as mudguards, lights and bike computers won’t be fitted by our mechanics. We find that accessories travel much better in their original packaging and are less likely to get damaged in transit. When your bike arrives, you will need to fit the accessories.
-
We use TNT to deliver bikes to our customers. They are aware that the boxes contain bikes and need to remain upright to remain undamaged. We use a “next day” service which although not guaranteed means 99% of the bikes we dispatch arrive with our customers the next day. If you want to track your delivery please check your email for tracking information around 7pm. Please note that next day delivery is from point of dispatch and not day of order.
When Your Bike Arrives
Once you have removed the bike from the box, you will need to do a small amount of assembly before your bike is ready to ride. Don’t worry, this should only take 10 – 15 minutes to complete if you follow the instructions that come with the bike. Here is a quick overview of the steps you’ll need to take.
Open The Box
Carefully remove all packaging and zip ties from the cycle.
Attach Handlebars
Fit handlebars to front of stem and evenly tighten faceplate over bars using a 4/5 mm Allen key according to the manufacturer’s torque settings.
Install Front Wheel
Identify your brake type and wheel attachment system and follow the specific instructions found below
Instructions for quick release wheels Instructions for thru-axle wheelsFit Front Brake (Rim Brake Models Only)
Re-connect front brake using 5mm Allen key. Make sure brake blocks are an even distance from the rim and brake cables are not wrapped around the frame which restricts the movement of the forks. If your not sure which brake type your new bike uses please refer to our summary below Summary of brake types
Fit Your Saddle
Insert seatpost and saddle to the seat tube of the cycle making sure quick release or seat clamp bolt is tightened. Set the saddle to your preferred position and tighten.
Record Frame Number
Take note of the Frame No which is usually stamped on the underside of the Bottom Bracket shell. This is used for insurance purposes and if the bike is stolen.
Fit Pedals
Fit pedals to crank arms with a 15mm spanner or Allen key depending on pedal type with bike. Right pedal(R) to the right side crank arm (side with gears) left (L)pedal to non geared side. Pedals are marked on their axles with L & R. When looking at the crankset straight on, right hand pedal tightens clockwise, left hand pedal tightens anticlockwise. Be careful NOT to cross the threads of the pedals in the crank arm – we advise initially using your fingers to make sure the pedals thread in smoothly – they should initially thread in easily with little resistance. Make sure the pedals are VERY firmly tightened – you should use your full weight on the spanner to ensure this. Incorrectly installed pedals will ruin your crankset. If you are unsure please call us to speak to one of our mechanics before you attempt to ride the bike. We WILL NOT be held responsible for incorrectly installed pedals – all of our bikes are pre built, tested and checked (including pedal fitment). Pedal Fitting Video
Fit reflectors
Now fit reflectors to forks or handlebars (white) and to seat pin (red).
Final Checks
Make sure that bars, pedals and seatpost are tight and in the correct position. Check brakes and gears are adjusted and working before riding.
Enjoy!
After initial ride check all nuts on bike are tight, especially handlebars, stem, pedals, wheels and brakes. For additional information refer to the owner’s manual.
Different Types of Axle
Most bikes come with the three major axle types shown below. The examples shown below should help you identify which your new bike uses and how it may alter initial assembly. If you need a little help get in contact and we’ll assist you with getting your new bike on the road.
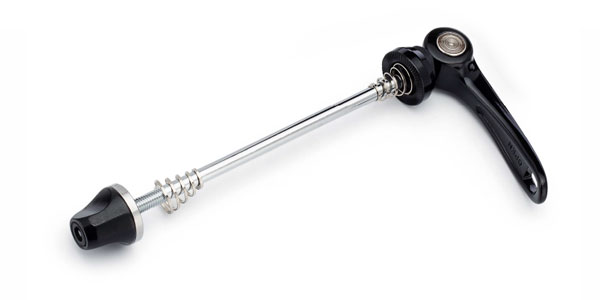
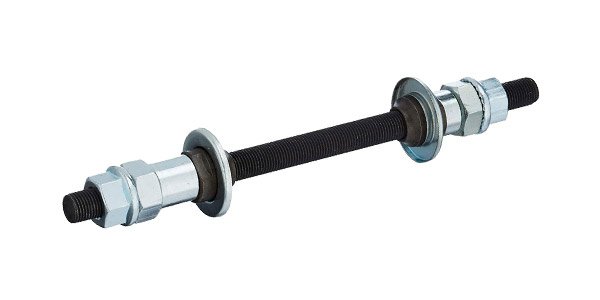
Quick Release
The quick release assembly will be in the small parts box. Remove the adjusting nut and the first conical spring. Insert the skewer through the hollow axle in the centre of the hub. Reinstall the conical spring over the threaded end of the skewer, small end first. Be sure that the quick release lever is positioned on the opposite side of the brake disc. Reinstall the adjusting nut, threading it onto the threaded end of the skewer. A few turns are enough at this stage. The critical final adjustment will be made after the wheel is installed in the fork.
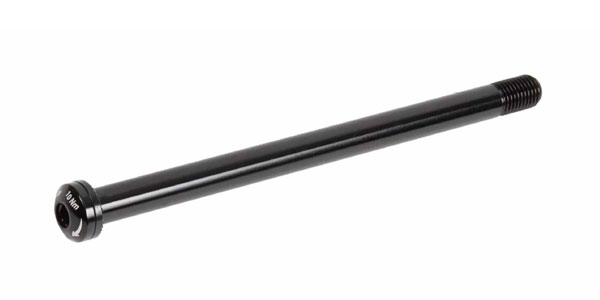
Thru Axle
If your bike has a thru-axle it will generally be already installed in the forks of your new bike when it arrives. Simply undo the bolt end and slide the axle out of the forks. Insert your front wheel into the forks and slide the thru-axel back through the dropouts and hub. Then re-attach the bolt you removed at the beginning.
Nutted
The nutted axle is one where outer hex nuts are used to hold the wheel axle in the dropouts. When installing a bolt on axle, you may have to turn the nuts anticlockwise and spread the axle washers out to create some space on the axle so that it fits into the fork dropouts.
Different Types of Brakes
Most bikes come with the three major brake types below. Other types are less common, if you can’t see the type of brakes used on your bike here and need a little help get in contact and we’ll assist you with getting your new bike on the road. The examples shown below should help you identify which your new bike uses and how it may alter initial assembly.
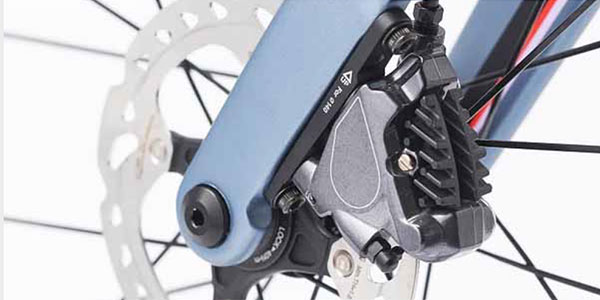
Disc Brakes
Remove the disc brake spacer from the caliper. This is a plastic spacer keeping the pads separated for the disc to locate between. After the spacer is removed, before the wheel is installed, DO NOT squeeze the front brake lever. Lift the fork and position the front wheel under the fork. As you lower the fork, carefully position the wheel so that the brake rotor fits between the pads in the brake caliper. Then, lower the fork further and align the hub axle ends with the fork dropouts.
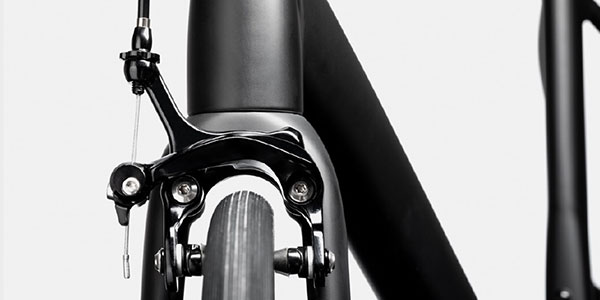
Rim Brakes
Locate the front brake quick release lever on the brake caliper. Move this lever up. You will see this causes the caliper arms and brake pads to spring outward, opening up to create more space for the wheel to pass through. Lift the fork and position the front wheel under the fork. First align the wheel so that the tire fits between the brake pads. Next, lower the fork further and align the hub axle ends with the fork dropouts.
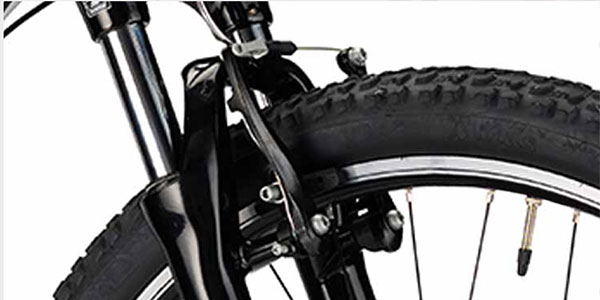
V-Brakes
Temporarily disconnect the curved brake cable guide from the bracket that holds it. After you disconnect, the brake arms will spring outward, creating more space for the wheel. Lift the fork and position the front wheel under the fork. First align the wheel so that the tire fits between the brake pads. Next, lower the fork further and align the hub axle ends with the fork dropouts.
How To Install Pedals
If your not sure about how to correctly fit your pedals this video is a great introduction and should have you in the saddle in no time.